
Now we’ll look at configuring SAML integration between VMware Identity Manager and Salesforce for Workspace ONE.
Definition: Security Assertion Markup Language (SAML). It is an open standard which enables SSO for many different services and platforms. Authenticating with SAML allows a user to log in once per session.
Here are the defining components of SAML:
- Service provider (i.e. an application.)
- Identity provider (who is authenticated, and what authentication methods are used.)
- End user who is accessing over SAML.

- User starts the SAML Application
- Service Provider (SP) sends a request to the Identity Provider (IdP) for authentication
- If the user is not authenticated, the IdP requests authentication from the user. (I.e. username and password)
- The IdP then sends response to the SP with a token for that user.
To go through this guide, you’ll need the following. So load up, and let’s get poppin’
- A Salesforce login. First create a trial Salesforce developer account.
- A VMware Identity Manager tenant at your disposal.
Now SAML can be explained as a way of making two parts speak the same language.
So what we are going to do now is:
Export the SAML Metadata from VMware Identity Manager
- Log on to your VMware Identity Manager-tenant (URL: mXXXXXX.vmwareidentity.eu/)


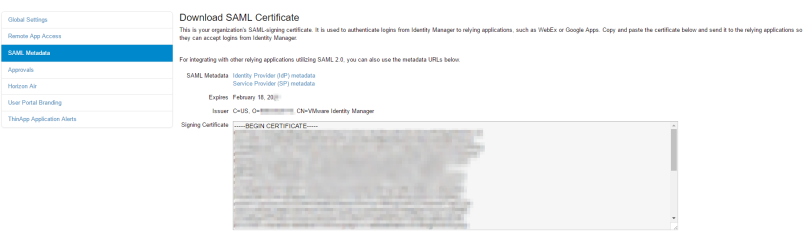

- Right-click “Identity Provider (IdP) metadata” and choose “Save link as..“

- Save the metadata file (idp.xml).
Add application from the catalog
Import the SAML Metadata File to Salesforce
- Now let’s start off by navigating to https://login.salesforce.com
- Enter your Salesforce username and password and hit “Login”.
- Type in “single” to find the SSO setting we will be configuring.

- Choose “Edit” and Select “SAML Enabled” to enable SSO with the SAML protocol.

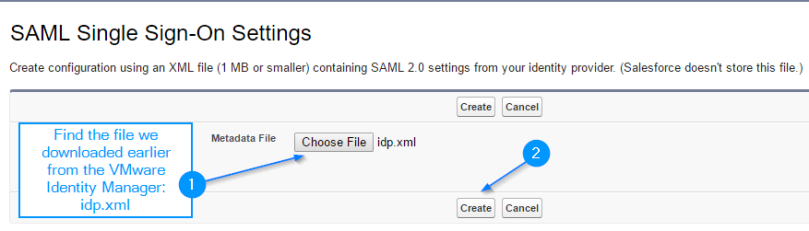
- Choose “New from Metadate File”

- Now we upload the idp.xml that we downloaded from our VMware Identity Manager tenant. Hit “Create” and the SAML SSO settings will populate.
- Now we need to update the SAML Settings. First off Select “Assertion contains the Federation ID from the User object.” and hit “Save”.

- Hit “Download Metadata”.

- Save the file it’ll be a .xml with a name similar to SAMLSP-XXDXXXXXXXXQ.xml.
Register your domain on Salesforce
Now that we’ve downloaded the SAML metadata file, we need to register our domain.
In the search box on the left, we will enter “my domain” and click “My Domain”.

- In the field “Choose Your Domain Name”, enter a domain name.
- To confirm that it is available, hit “Check Availability.”
- Finish with hitting “Register Domain.”

Now we wait for an e-mail from Salesforce, that the domain is ready.

And after a few minutes:

Now we return to “My Domain”, and edit the authentication configuration.
- In the search box on the left enter “my domain” and click “My Domain“.
- Next to “Authentication Configuration, hit “Edit“.

That concludes part one!
If there are any topics or areas you’d like me to focus on, don’t hesitate to let me know! As always you can reach me at @UlvBjornsson, via the comments or by connecting with me on LinkedIn.

Did you ever publish a part #2 for this?
LikeLike
I willl take a look and see if I can find it, thank you for notifying me. And if I don’t please share your challenge and perhaps I can help you out or point you in the right direction.
Ulv
LikeLike